
Most homeowners are familiar with how to adjust a toilet flush valve. After all, they do it every time they use the toilet.
But if you’re having trouble flushing your toilet, or the water isn’t coming out as quickly as it used to, there could be a problem with your flush valve. We got you covered. This guide will show you how to adjust the flush valve on most toilets.
Most toilets come with a flush valve that can be adjusted to ensure a proper water flow when flushing. This is typically done by turning the valve handle to the left or right.
However, it may be broken if the handle doesn’t turn easily or move at all. In this case, you will need to take the toilet apart to adjust the flush valve.
But before going to the main topic, let me clarify some of the basic related toilet flush valves. So then it will be easier for you to understand everything and also helps you to adjust the toilet flush valve correctly.
What Is A Toilet Flush Valve?
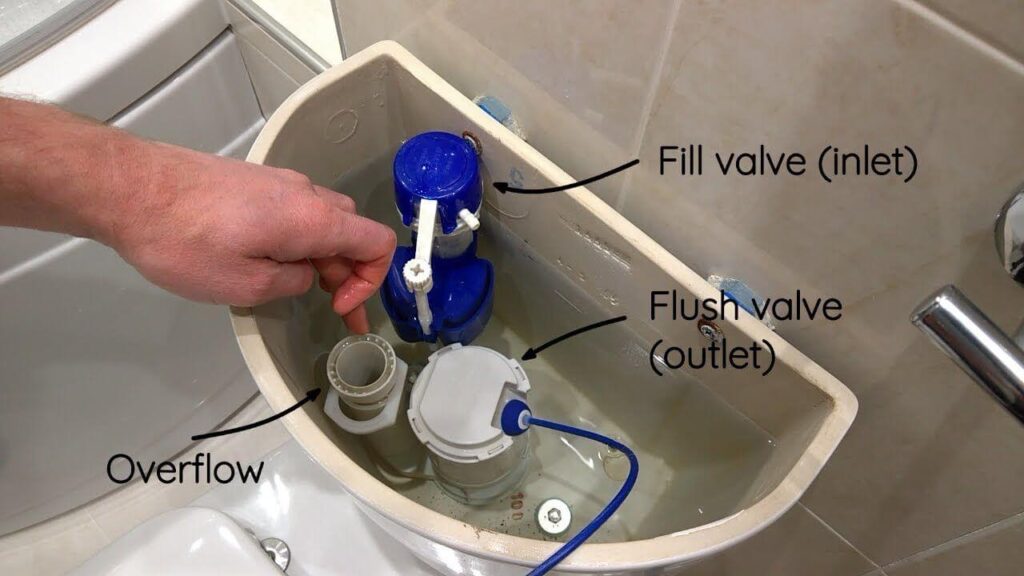
A toilet flush valve is the part of a toilet responsible for flushing the contents of the bowl when you push the handle. The valve is usually located under the toilet seat, and it has two parts: an inlet and an outlet, which are connected by a tube.
When you push down on the handle, water flows through this tube and into the bowl, where it pushes out whatever waste remains inside.
How Does The Toilet Flush Valve Work?
As many of us already know, the toilet flush valve is one of the most important parts of your toilet. It’s what allows you to flush your toilet, and it works by opening and closing to allow water into the bowl.
The process begins when you push down on the handle in your toilet tank. This activates a chain that raises a rod in the back of your toilet tank. As this rod rises, it pulls up on a lever that opens the flush valve underneath your toilet bowl.
This allows water from your tank to flow into the bowl through a siphon jet’s opening. As it flows through this tube, it creates enough pressure to force waste into your sewer system.
The siphon jet closes once all of the water has passed through it, and then gravity takes over again as it pulls waste out of your pipes and into the sewer system below.
When you release pressure on the handle by pushing it up again, another chain pulls down on another lever which closes off access to the siphon jet so that no further water will run down into them during use (which would cause problems such as clogs).
For a better understanding read our blog on how the inside of a toilet work
Common Adjustments For A Toilet Flush Valve
The three most common adjustments for a toilet flush valve are the water level, the height of the flapper, and the angle at which the flapper sits.
1) Water Level
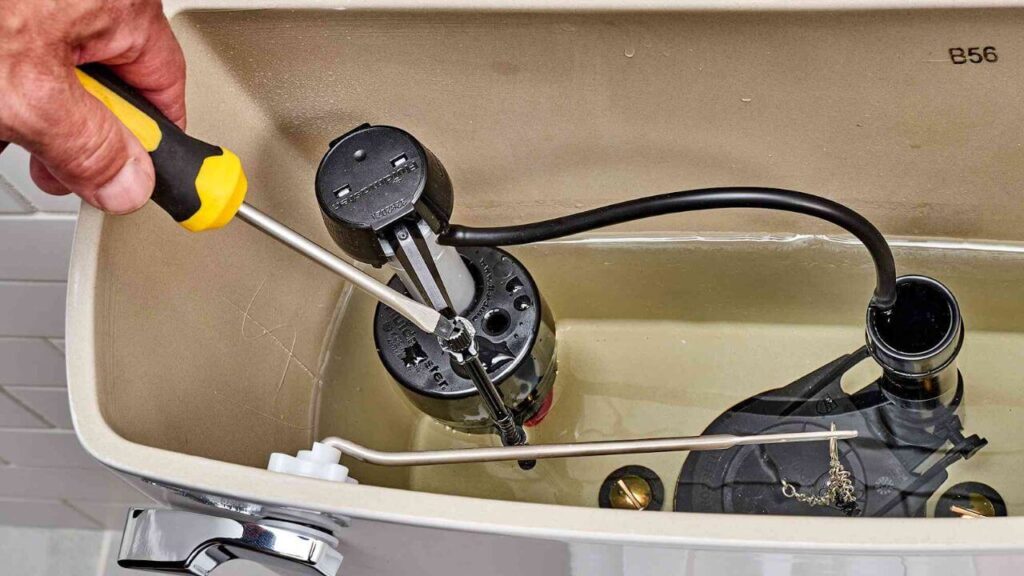
The water level is often set too high. This can result in excess use of water or other issues. To adjust this, you may need a screwdriver and pliers.
2) Flapper’s Height
The height of the flapper should be adjusted so that it seals properly when it closes. If this is not done correctly, you may have trouble getting your toilet to flush properly. You may need only a pair of pliers and some patience to adjust this.
3) Angle Of The Flapper
The flapper’s angle also plays an important role in how well your toilet will flush. If it sits too steeply, it might not seal properly when it closes, which could cause problems with your toilet flushing correctly and wasting more water than usual.
This could lead to other problems down the road, such as clogs and leaks due to the increased volume coming into contact with less space than usual (which means more force behind each drop).
Types of Flush Valves
To correctly adjust the toilet flush valve, it’s better to know the many types of flush valves and a little bit of know-how about them. There are three main types of flush valves: ballcock, lever, and chain (piston).
1) Ballcock
A ballcock is a flush valve that uses water pressure to open and close the valve. When you push down on the handle of your toilet, you increase water pressure inside the tank, which opens up a small hole and allows water to flow out of your tank into the bowl.
This action also shuts off the flow of water from the tank through another small hole in the bottom of your toilet tank. When you release your hand from the handle after flushing, water pressure in the tank decreases, causing both holes to close and stop any further water flow out of your toilet tank.
2) Lever Flush Valve
This type of flush valve has an arm attached directly to it that moves up or down as you push or pull on it. As you push down on this arm, it raises a rod attached to a plunger that pushes against the flapper valve inside your toilet tank.
This action lifts this flapper valve to cover up an opening in your bottom drain pipe below it. This prevents water from flowing out into this drain pipe when you press down on this lever.
3) Chain (piston) flush valves
Chain (piston) flush valves use a piston that moves up and down when you press its handle to open or close them. This type of flush valve is usually found in two-piece toilets because it requires less space than other valves.
There is no internal mechanism at all—instead, you pull up on a chain attached to a piston inside your toilet tank when you want to flush.
How To Adjust Toilet Flush Valve
Now, you have a better understanding of the basics of a flush valve and its types. Now it will be easier for you to adjust the toilet flush valve no matter which type.
How To Adjust A Ballcock
Adjusting a ballcock flush valve is a simple process. The first thing you’ll want to do is turn off the water supply to the toilet. Then, unscrew the handle of your toilet tank and remove it completely.
Next, look inside your toilet tank at the ballcock assembly (the part that looks like an upside-down cup). There should be a screw at the bottom of this assembly that you can loosen with a wrench (this will allow you to adjust how much water comes out when you flush).
When loosening this screw, make sure not to loosen it too much or too little—you want just enough water coming out so that there’s enough for flushing but not so much that it overflows when you flush.
Once you’ve done this, reattach all parts of your toilet and turn on the water supply again.
How To Adjust Lever Flush Valve
Just like the Ballcock flusher, adjusting the lever flush valve is a simple process you can do yourself in just a few minutes.
First, find the lever flusher’s handle. There should be a small round, smooth knob on the flush valve, which may be located near the tank or behind it. Consult your owner’s manual for instructions if you’re unsure where it is.
Next, turn the handle clockwise until it stops moving. Then turn it counterclockwise to loosen it. As you do this, you’ll probably hear some water flowing through your pipes, so be prepared with a bucket or pan nearby to catch any drips or leaks.
When the handle is loose enough to move around freely but still attached to its base by its wires or chain, pull up or push down on the lever until you’ve got it positioned at an angle that feels comfortable for you as you use it (you may have to experiment with different angles).
Then twist back and forth until you find an angle that makes it easy to adjust without moving your hand too far away from where it rests on top of the lever flusher’s base while holding onto its handle.”
How To Adjust A Chain (Piston) Flush Valve
Adjusting a chain (piston) flush valve can be tricky, but with the right tools and techniques, you’ll be able to do it in no time.
First, you’ll need a pair of pliers and some oil. Ensure the drain is clear and you have a bucket to catch any spills.
Next, remove the cap from your flush valve by turning it counterclockwise with your pliers and pulling it off. If there is water in the line, make sure you’ve drained it first!
Once the cap is removed, locate the chain attached to a stopper at the bottom of your toilet tank and pull it upwards until it reaches an open position. If necessary, you can use your pliers to adjust this part of your valve.
Next, add oil to the opening where you removed your flush valve cap—the amount depends on how much water remains in your tank—and then replace it with its hole using just enough force.
So that no leaks occur when pressing down on it tightly enough for good contact between metal parts yet not too hard as this will damage them both instead (you don’t want that!).
Also read our blog on how to flush a toilet from the inside
Final Words
Adjusting the toilet flush valve can help keep your bathroom running smoothly. Remember that different toilets require different adjustments, so consult your owner’s manual for specific instructions. Finally, always ensure that the water level is correct before adjusting the flush valve; otherwise, you could end up with a clogged toilet.