
Having encountered my fair share of plumbing predicaments, I understand the importance of knowing how to tackle everyday household issues.
A simple procedure can save you from potential mess and inconvenience when draining a toilet tank.
Whether for maintenance, repairs, or a thorough cleaning, the process is relatively straightforward. With a few essential tools and a bit of patience, you can quickly master this task.
In this guide, I’ll walk you through the steps I’ve learned over the years, offering tips to make the process smooth and hassle-free.
Let’s dive into DIY plumbing and keep your bathroom running smoothly!
Should the Toilet Tank Drain Completely?
Ideally, a toilet tank should only drain partially during regular use. The water in the toilet tank serves a crucial purpose in the toilet’s flushing mechanism.
When you press the flush lever, water from the tank flows into the toilet bowl, creating a siphon effect that removes waste and cleans the bowl.
If the toilet tank were to drain completely after each flush, there wouldn’t be enough water to create the necessary siphon, and the toilet might not flush effectively.
You might encounter issues like incomplete flushing, clogs, or flushing to clear the bowl multiple times.
Also Read:
How To Fix A Leaky Toilet Tank | Your Quick Guide To Relief
How To Install Bidet On Tankless Toilet | Upgrade Your Toilet
Tankless Toilet Problems | Is It Residential Home-Friendly?
How Do You Get Water Out Of Your Toilet Tank | Step-By-Step Procedure
Now it’s time to teach you guys how to drain the toilet tanks like a pro. Here’s a step-by-step procedure to guide you through the process.
Make sure to follow each step to get your desired result.
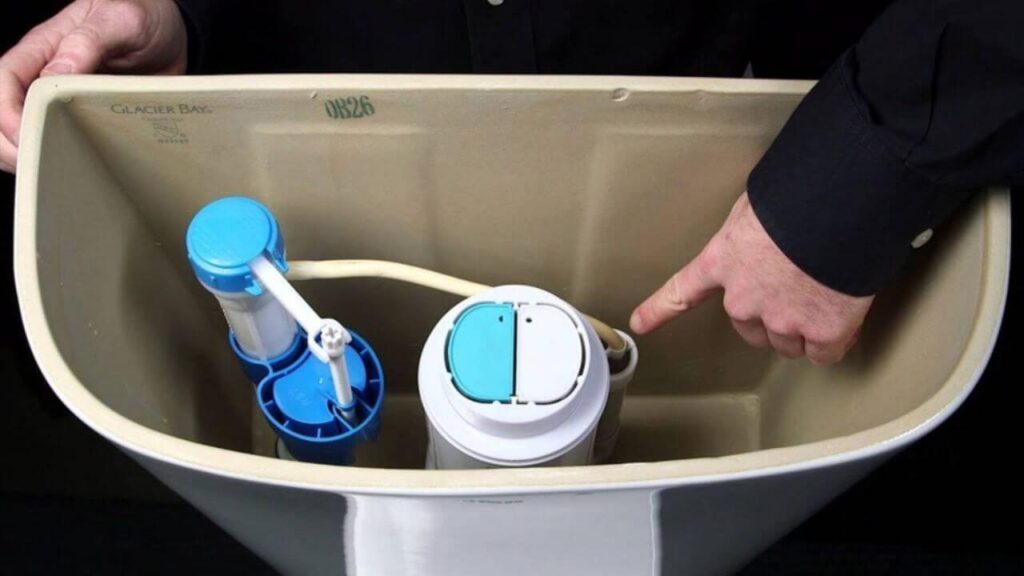
Step 1: Gather Your Materials
Ensure you have all the necessary items ready, including a bucket or container to collect the water, a sponge or towel to soak up excess water, gloves if desired for hygiene, and old towels or rags to protect the floor from spills.
Step 2: Turn off the Water Supply
Locate the water supply valve, usually a small lever or knob near the bottom of the toilet tank or on the wall nearby.
Turn it clockwise (right) to shut off the water flow. This prevents water from refilling the tank while you work.
Step 3: Flush the Toilet
Lift the toilet tank lid and press the flush lever down. This initiates flushing, draining water from the tank into the toilet bowl.
Step 4: Remove Excess Water
As the toilet flushes, use a sponge, towel, or a wet/dry vacuum to remove as much water as possible from the tank.
Start with the sponge or towel, wringing it into a bucket or container. If using a vacuum, follow the manufacturer’s instructions.
Step 5: Use a Sponge or Towel
Soak up any remaining moisture from the bottom of the tank using a sponge or towel. This ensures you get rid of as much water as possible.
Step 6: Empty the Container
As your bucket or container fills with the collected water, pour it into a sink, bathtub, or drain outside.
This step prevents the bucket from overflowing and makes room for more water.
Step 7: Check for Residual Water
Inspect the tank closely, paying attention to corners, crevices, and hard-to-reach areas where water might be hiding.
Use your sponge or towel to soak up any remaining moisture.
Step 8: Perform Necessary Tasks
If you’re conducting maintenance, repairs, or cleaning, proceed with these tasks while the tank is empty.
This might include replacing faulty components, descaling the interior, or adjusting the water level.
Step 9: Turn on the Water Supply
Slowly turn the water supply valve counterclockwise (left) to gradually allow water to flow back into the tank. This refills the tank for the next flush.
Step 10: Check for Leaks
Observe as the tank refills. Look for any signs of water leakage around the fill valve, flush valve, or other areas.
If you spot leaks, address them promptly to avoid water wastage and potential damage.
Step 11: Adjust Water Level (Optional)
If you adjusted the water level during your tasks, ensure it’s set to the recommended level.
This level is usually marked inside the tank and ensures optimal flushing performance.
Step 12: Flush and Test
Press the flush lever to ensure everything functions correctly with the tank refilled. Observe the flush’s effectiveness and drainage speed.
Step 13: Replace Tank Lid
Carefully place the toilet lid back onto the tank, ensuring it’s properly aligned and secured.
Throughout the process, it’s essential to be patient and careful to avoid damaging any components.
If you encounter difficulties or are unsure about any step, seek guidance from a professional plumber to ensure a safe and effective process.
Also Read:
How To Clean Toilet Tank With Vinegar | Vinegar Wonders
How To Remove A Toilet Tank | Unveiling The Art Of Removal
Is Toilet Tank Water Clean | Know Experts Opinions
Why Doesn’t the Toilet Tank Drain Completely
If your toilet tank isn’t draining entirely after each flush, it could be due to various reasons. Here are some common factors that might be causing the issue:
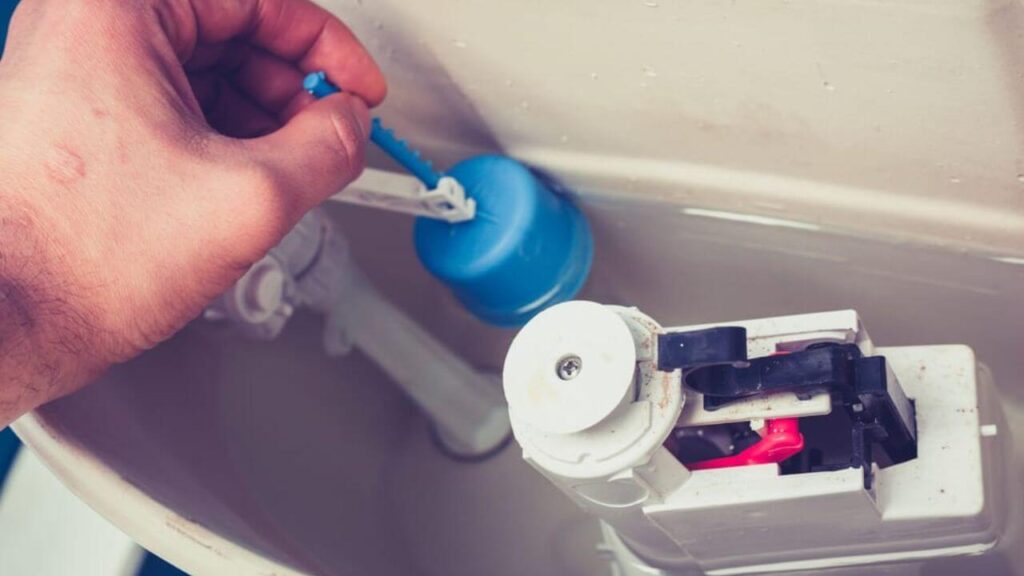
1. Malfunctioning Flapper
The flapper is a rubber valve located at the bottom of the tank. When you flush the toilet, the flapper lifts to release water from the tank into the toilet bowl.
If the flapper doesn’t seal properly after flushing, water can continuously leak from the tank into the bowl.
This constant leakage wastes water and prevents the tank from draining completely after a flush.
Solution: To address this issue, inspect the flapper for signs of wear, damage, or misalignment. If necessary, replace the flapper with a compatible one.
Ensure that the flapper seats properly onto the flush valve and creates a watertight seal when the toilet is unused.
Related blog: Can a Bad Flapper Cause a Toilet To Overflow
2. Water Level Adjustment
The water level inside the tank is crucial for the flushing process. If the water level is too high, it might lead to efficient flushing and complete drainage.
The water level is typically marked inside the tank and should be set according to the manufacturer’s recommendations.
Solution: Locate the water level adjustment screw on the fill valve to adjust the water level. Turning this screw will raise or lower the water level.
Adjust it so that the water level is just below the marked level inside the tank.
Related Blog: How To Adjust Water Level In Toilet Tank | A Quick Guide
3. Clogged Drain or Vent
A clogged drain line or vent pipe can cause water to back up in the plumbing system, impeding the proper drainage of the toilet tank.
These blockages might be caused by debris, accumulated waste, or external factors like tree roots infiltrating the pipes.
Solution: If you suspect a clogged drain or vent, you may need to use a plumbing snake or auger to clear the blockage.
If the clog is severe or hard to access, it’s advisable to seek professional plumbing assistance.
Related blog: Can a Clogged Vent Cause a Toilet To Overflow
4. Faulty Fill Valve
The fill valve controls water flow into the toilet tank after each flush. If the fill valve malfunctions, it might not allow sufficient water to enter the tank.
This can result in solid flushes and complete drainage.
Solution: Check the fill valve for any visible damage or improper functioning signs. You might need to clean or replace the fill valve if it’s malfunctioning.
If you need clarification on this task, it’s best to consult a professional plumber.
5. Blocked Flush Valve
The flush valve releases water from the tank into the toilet bowl during a flush. If this valve is blocked or damaged, water won’t flow effectively, causing incomplete flushing and drainage issues.
Solution: Inspect the flush valve for any obstructions or damage. Clean or replace the flush valve to ensure smooth water flow during flushing.
Related Blog: How Does A Flush Valve Work – A Detailed Guide
6. Mineral Buildup
Over time, minerals in the water can accumulate on various components within the tank. This can include the flapper, flush valve, and fill valve.
Mineral buildup can interfere with the proper operation of these parts and lead to incomplete drainage.
Solution: Regularly clean the inside of the tank to remove mineral deposits. You can use a mixture of vinegar and water or a commercial descaling solution to dissolve and remove these deposits.
7. Worn Gaskets or Seals
Gaskets and seals provide watertight connections between different parts of the toilet.
If these components deteriorate over time, they can cause leaks that prevent the tank from draining completely.
Solution: Inspect gaskets and seals for signs of wear, cracks, or deterioration. Replace any damaged gaskets or seals to ensure proper sealing and drainage.
8. Improper Installation
Specific components might only function as intended if the toilet was installed correctly. This could lead to drainage, flushing, and overall toilet performance issues.
Solution: If you suspect that improper installation is the cause of drainage problems, consider consulting a professional plumber to assess and rectify the installation issues.
Also Read:
Why Is My Toilet Gurgling On A Septic System | Gurgling Woes
How To Improve Toilet Flush Strength? | Flushes With Power
Why Does The Water In the Toilet Tank Drain Slowly?
When the water in a toilet tank drains slowly, it can indicate several potential issues affecting the flushing and drainage efficiency.
Here are some common reasons for slow drainage in a toilet tank:
1. Partially Clogged Drain or Trap
Accumulated debris, mineral deposits, or foreign objects can partially block the drain or trap in the toilet bowl.
This obstruction restricts water flow from the tank into the bowl during flushing, leading to slow drainage.
Solution:
- Plunger: Use a toilet plunger to create suction and dislodge the blockage. Place the plunger over the drain opening and pump it vigorously. This can often push the clog through the trap.
- Toilet Auger: If the plunger doesn’t work, use a toilet auger or plumber’s snake. Insert it into the drain and rotate it to break up and remove the obstruction.
- Professional Help: If the clog is severe or complicated to remove, consider consulting a professional plumber to avoid causing more damage.
2. Low Water Level in Tank
If the water level inside the tank is lower than optimal, there might not be enough water released during a flush to create a strong siphon action. This can result in slow drainage and incomplete flushing.
Solution:
- Adjust Water Level: Check the water level marking inside the tank. Adjust the water level by using the adjustment screw on the fill valve. Increase the water level to the recommended mark.
- Proper Flapper Seal: Ensure the flapper sits appropriately on the flush valve. A faulty seal can lead to water leakage, reducing the amount of water available for flushing.
3. Partially Closed Fill Valve
The fill valve controls the water flow into the tank after each flush. If the fill valve is only partially open, it will supply less water to the tank, leading to slow drainage.
Solution:
- Check Fill Valve: Make sure the fill valve is fully open. Adjust the valve to allow maximum water flow into the tank.
- Clean or Replace: If the fill valve is clogged or damaged, clean it or replace it with a new one to ensure a smooth water supply.
4. Clogged Fill Valve or Float Mechanism
If the fill valve or float mechanism is clogged with debris or mineral deposits, it might not operate smoothly, resulting in reduced water flow into the tank. This can cause slow drainage during flushing.
Solution:
- Inspect Components: Check the fill valve and float mechanism for debris or deposits. Clean these components thoroughly.
- Replacement: If cleaning doesn’t resolve the issue, consider replacing the fill valve or float mechanism.
5. Faulty Flapper or Flush Valve
A malfunctioning flapper or flush valve can lead to inefficient flushing and slow drainage.
If the flapper doesn’t lift properly or the flush valve is obstructed, water might not be released effectively into the bowl.
Solution:
- Inspect Flapper and Flush Valve: Check the flapper for proper alignment and sealing. Inspect the flush valve for any obstructions.
- Clean or Replace: Clean the flapper and flush valve to remove deposits. If they are damaged, replace them with suitable replacements.
6. Ventilation Issues
Every plumbing fixture, including toilets, requires proper ventilation.
If the vent pipes that allow air to enter the plumbing system are blocked or inadequate, it can slow down drainage by creating a vacuum effect.
Solution:
- Professional Assessment: Ventilation issues can be complex. Consult a professional plumber to assess the ventilation system and identify blockages or deficiencies.
- Ventilation Repair: A plumber can clear blocked vent pipes or suggest modifications to ensure proper air circulation in the plumbing system.
7. Low Water Pressure
Insufficient water pressure in the plumbing system can lead to slow drainage from the toilet tank.
Low water pressure affects the force with which water is released from the tank during flushing.
Solution:
- Contact Water Utility: Contact your provider if you suspect low water pressure. They can check and adjust the water pressure if needed.
Also Read:
Why Does Flushing The Toilet Affect The Shower
Why Put a Cup Under Toilet Seat | Something You Don’t Know
Bottom Line
Draining a toilet tank is a simple task that can help with maintenance or repairs. Following the steps carefully ensures a smooth process. Regular maintenance keeps your toilet functioning optimally.